
Home Renovation January 2014
I had a 3 week winter break the end of 2013, leading into 2014. The stars aligned. I had researched, knew what I wanted, made a plan, and Pedro, our contractor, was free during that time to do the work and assured me it would be completed in time for me to rest a few days before school started back. They had all of the above projects completed in less than a week, even taking a Sunday off. I will be using “we” after this, because after all, I did ask Marc what he wanted occasionally and he did pay for it.
We had things to do prior to the renovation beginning. We ordered special items like the faucet and the sink, making sure they would arrive in plenty of time for inspection and a possible reshipment if there was anything wrong. We made a plan for eating, sleeping, etc. Luckily, for us, this part was fairly easy as we had an upstairs to retreat to and we were having no work done up there (yet). Made reservations to spend some time out of town during the majority of the dust everywhere, noisy, hammering, and sawing event.
This is the process we went through, but it will be different for everybody, depending upon the circumstances.
The week prior to renovations
Step 1: Put up shelves in the garage to stack boxes and items that needed to be out of the way. Packed up everything that needed to be out of the way and put labeled boxes on the shelves in the garage. Put everyday items, like the toaster, unpacked on one designated shelf for easy access. And yes, I did go after that toaster more than once. During this time, I was home to accept special and/or freight deliveries of ordered items. Honey loves getting deliveries, probably because she has seen boxes of toys for her, come from Amazon. The delivery of the sink was no exception. I wonder if she will still like it after her 1st bath in it.
Step 2 : Moved large items, like china cabinets, couches, etc..that we could live without, to the garage. We had two chairs, an end table to share, and the tv as our furniture for a few days.
Step 3: Get out of the way and let the work happen.
Demolition began early on Saturday, January 4. We hung out at my parents house for the day because our original plan was to start demo on the following Monday. But Pedro and his guys had cleared their schedule early, so they began. By Saturday evening ~ carpets, counters, sink – all gone! Appliances were all moved away from their normal places, to one side of the kitchen. ps. a good contractor should be able to figure out how to keep your fridge plugged in, ours did! We spent Saturday night in the house, with cold cement floors, doing dishes in the bathroom sink, and all the appliances in a corner. We packed and left for Reno Sunday morning.
This renovation covered these areas of concern which were described in the post “Renovations are Tricky.” There are links to the items that were purchased from Amazon on My Favorite Products Page.
1. The kitty carpet. (We have never had a kitty)
2. The great kitchen divide. (Ugly gold strip)
Taken care of by installation of commercial wood look vinyl plank flooring, purchased from Home Depot, throughout the whole downstairs. Perfect choice for those with pools, pets, kids, and left-handed husbands.
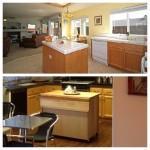
3. The island that ate the kitchen. (Aka long skinny cabinet with counter)
The old island was removed, and the electric from the island was routed to an outlet in the floor that would be hidden by a new island. The new island is on wheels and has a drop down butcher block top. I ordered it from Amazon and put it together myself. The beauty of this island is that if I want to move a large table into the kitchen for a party, the island can be moved elsewhere. It has locking wheels, but it is heavy enough that we have yet to lock them.
4. The ugliest tile EVER. Seriously. We found extra tiles in the garage. Why?
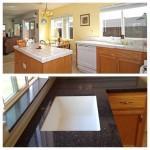
The ugly tile was all demolished and replaced by a man made quartz that looks like granite. It is less expensive, more durable, and it does not have to be sealed! Yay, for low maintenance! It really is hard to tell the difference. Pedro got this from his counter guy, it was leftover from a previous job, so we got a great deal. Slabs can be purchased from Home Depot and the name of the color is Ethan.
5. Icky sink area.
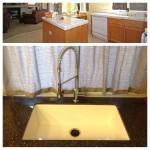
The sink area was updated by the installation of a new under mount composite granite sink and new faucet. It was installed with no deck plate as I requested and the dishwasher vent was hidden under the sink. I like that there is less “faucet type stuff” on the countertop to clean. Cleaning the countertop is a breeze, just wipe it all into the sink. We purchased both the sink and faucet from Amazon.
6. Ugliest front door on the street.
Brand new door and hardware. It is staying white, unless a color speaks to me. Door from Home Depot.
Every renovation has to have some unexpected trial or tribulation. Ours was no different and it was, of all things, the backsplash. Ironically, we had given almost no thought to the backsplash and since I really wanted all tile and grout gone – I had asked them just to make a small backsplash with the countertop quartz material. While in Reno, Pedro called us to tell us that after cutting the counters and discarding some unsuitable pieces that they were not going to have enough quartz to do the backsplash. The demo of previous tile had also torn up the walls higher than they had predicted and there just wasn’t enough material. If we didn’t do a substantial backsplash, they would also have to repaint the whole kitchen and adjoining living room. He suggested some black tile or a strip of plain black granite. I shared that I was not crazy about that idea, because I didn’t think it would look great with the white sink. I was also very unsure about adding another type of surface. Marc was very helpful during this part of the process by turning the whole decision over to me and reassuring me that whatever I chose would look great. No pressure there!
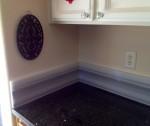
Pedro assured me he could find something I’d like. I put my faith in him, after all he was used to building million dollar homes for people much pickier than I. He went to some places he knows to see what kind of scraps they had and started sending pictures of choices. One of the texts he sent was a sheet of striped white and gray marble, with the words “crazy idea.” It seems that several sheets of this beautiful marble had been ordered for a big job, but one was not accepted because it had several small flaws. The original cost was $1000, but since it was flawed, a solo sheet, and of little use to most contractors, he got it for $100. Since it was being used as a backsplash, there was plenty of material, even with the flaws. Out of all the things he sent, that particular idea kept speaking to me. I have to be honest though, I lost sleep, while Marc snored away, and I shed a few fearful tears over this after I gave him the go-ahead. All for naught. It came out absolutely beautiful. And there was enough left over that we now have a beautiful slab of marble that covers the stovetop. Perfect for rolling out pie crusts and other baking needs.
Pictures never do it justice and even make it look a little like baseboard, but let me assure you, when you are standing in front of it – there is no question that this is quality polished marble. It is one of the things you just have to reach out and touch and then run your hand along.
Check back, because we are not done. We still have to decide what color the bottom cabinets will be, add a cabinet with a glass front over the dishwasher area, install a drum chandelier, and I want to try to incorporate an awning for our French bistro styled kitchen. Marc is not sure about the awning.
If you are considering a renovation, big or small, I’d love to hear from you and see pictures! Good luck to you. Remember to smile, be flexible, (like our new faucet) and try to have fun with it.




One thought on “January 2014 Renovation”